Showing posts with label accessories. Show all posts

Monday, March 3, 2008

The bag from H _ _ _ !


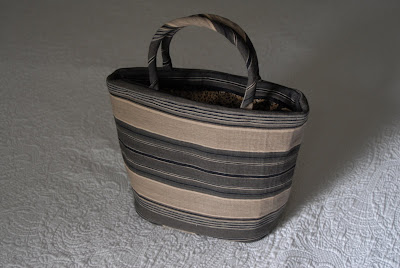
I had high hopes for this bag. I love the lines and size of it. This bag was perfect for me, just big enough, but not too big--loads of possibilities. I began sewing this last Saturday afternoon starting with the lining first, since I had forgotten to buy cording which was needed for the handles and piping around the bottom. The lining went together quite quickly, even with an inside zipper and outside zipper attached to the facings and lining. Then Sunday I ventured back to my machine and all the trouble started. I really did not want to drive to the nearest Joann's which might not even have the cording sizes I needed and would take at least an hour round trip. I improvised and raided the Boy Scout's rope bag and found nylon cords in the sizes I needed. Just snipped off a few inches and I was back in business. I made my piping for the bottom of the purse but had a terrible time trying to get the sides of the bag to attach close enough to the piping. I guess my biggest mistake was in my choice of interfacing. The pattern instructions recommend sew-in hair canvas interfacing, but I thought that fusible stiff Pellon would work just as well. After several tries even though I had marked the stitching lines, I decided that in order to get close enough to the piping, I would have to hand sew the bag. I had a couple rows of stitching on the bottom already, the stitching just needed to be closer to the piping. I must have spent an hour sewing that bottom together, innumerable pin pricks (I don't remember ever bleeding that much on a project) and numb fingers from forcing the needle through all the layers. Thankfully, all my pain and suffering ended in succe ss. Then came the hardest part attaching the facing and lining to the body of the bag. Since I so brilliantly chose a stripe that would show if I venture d out of line when trying to sew parallel to the stripe, lining everything up with all the bulk created by the interfacing was quite a venture. More pin pricks and bleeding on the project. This pattern made it hard to actually sew up to the sides of the bag since not enough room was given between the ends of the zipper and the sides of the bag. the facings could be a little wider too. I decided to treat the intersection of the two pieces like a notched collar and sewed just a stitch away from the intersection. This actually worked and allowed me to turn the bag to the right side with just a moderate amount of bulk. Then the pattern called for edge stitching around the top of the bag. This was not to be since the edge was too thick to fit under my machine's presser foot. I ended up hand tacking along the edge hiding my stitches in the stripes. If I kept up with this hand stitching through all that bulk, I would have developed callouses since the tips of a few fingers are becoming sensitive and hard.


Would I sew this again? Maybe. I still like the lines of this bag, but next time I will make modifications to the pattern. I need to rethink where the facing meets the sides of the bag and reshape the pattern piece. Also, I think if I use a less stiff interfacing on the facings and omit the piping on the bottom of the bag it will be much easier.

Thursday, July 12, 2007

Channeling Audrey


I love to sew. Most of my sewing is related to work clothes since I love tailoring, but that usually requires a muslin, lots of fitting and lots of sewing both machine and hand. Sometimes I just want to sew something fun, which means no muslin & fitting. Since PR changed the rules on their contest and an accessory is now one required item, rather than count one of my jackets as the accessory, I preferred to sew a purse. Handbags are fun. They allow for creativity (even though mine leans towards a more classic, subdued approach), imagination, and use of scraps and stuff already on hand. I don't sew these very often, but really get into it when I do. They also provide much quicker gratification. I'm sure these reasons are some of Deepika's since she is the queen of purse-making.

I had scraps left over from my jackets, lots from the cotton one and a little from the black linen jacket. I also bought several yards of ribbon last winter from an on-line ribbon site--I could not stop picking out different ribbons, but managed to stop when I hit $45. Mind you I rarely use ribbon outside of gift-wrapping. But once again, I was inspired and let loose. Well the black and cream ribbon in my stash was so perfect with the scraps from these two jackets, I just had to make a purse. I still needed a lining, but thought why not a black check lining--then off to my least favorite fabric source, Joann's. Sure enough they had a great match. I also needed a pattern and did not want to spend a lot and there wasn't any sale that day, so Butterick was a good choice. I found B4474 which was just the right size of 10" x 8"--not too big. Then the search for handles--but the only ones they had that worked were bamboo, so my choices were limited. A couple weeks later I was at Fabric Place and they had totally different handles to choose from. I found the perfect little black ones. I'll just have to save the bamboo for another purse.

Last Saturday was a great time to start this fun project. I cut out the pattern and fabric, fused two layers of interfacing to the body of the purse even though the instructions only required one layer and off I went. I'm also glad I fused two layers, because it really gave the bag more structure. In fact I could have used a stiffer interfacing, but I used what I had on hand, since I did not want to drive 20 minutes to Joann's or Fabric Place just for a piece of interfacing. The pattern was well drafted, but the instructions were so-so. They really did not skip any steps, but I question if the bags on the envelope were made using the same instructions. The two major complaints about the instructions were that, first, the lining bottom should be sewn with a very wide opening to allow for the cardboard to pass through after the lining is attached to the bag. The illustration showed a small opening which would not work if you don't want to bend the cardboard. I used two layers of cardboard for more stability. Then the other problem was that after the lining was attached and turned right-side out with the bag, you are expected to understitch all around the top of the bag. This is a nearly impossible feat. I found top-stitching around the top to be a much easier way to go. Besides, the instructions had already had you top-stitch the loops for the handles and the tab for the snap. It just made sense to top-stitch again. I had recently purchased some sew-on magnetic purse snaps from Sawyer Brook which worked perfectly and found a button in the button stash which was a close match to the handles, just the right touch to finish this bag. Here's my PR review on this pattern.

Now I'm on the lookout for great fabric to go with those bamboo handles.